Table of contents
Introduction
Once a portlet is placed on a portal page, its data is not directly shared with other portlets. IPC (Inter Portlet Communication) defines the ways that a Portlet can interact and communicate with another Portlet. There are four ways to make inter portlet communication :
In this post, we will see how to communicate between JSF portlets using public render parameters.
If you are interested in portlet communication between none-JSF portlets, this article may interest you.
Public Render Parameters
Public Render Parameters was introduced in JSR 286 (Portlet 2.0) and aims to pass data from a portlet to another. Below the steps to use public render parameters:
-
Define the public render parameter in the portlet.xml
First of all, you must define the public render parameter that will be handled by portlets. The definition is done in the portlet configuration file Portlet.xml. Below the declaration:
|
1 2 3 4 5 6 7 8 9 10 11 12 |
<portlet-app xmlns="http://java.sun.com/xml/ns/portlet/portlet-app_2_0.xsd" xmlns:xsi="http://www.w3.org/2001/XMLSchema-instance" xsi:schemaLocation="http://java.sun.com/xml/ns/portlet/portlet-app_2_0.xsd http://java.sun.com/xml/ns/portlet/portlet-app_2_0.xsd" version="2.0"> ... <!-- Defining the public render parameter --> <public-render-parameter> <identifier>identifier</identifier> <qname xmlns:x="http://namespace.com/">x:identifier</qname> </public-render-parameter> ... </portlet-app> |
Give a unique identifier to the public render parameter.
-
Configure portlets to use the public render parameter in the portlet.xml
All portlets that want to handle the public render parameter must declare the property <supported-public-render-parameter> in their Portlet.xml. This property must refer to the public render parameter identifier. To facilitate the understanding, let’s consider two portlets :
— Sender portlet : A first portlet named “senderPortetName” that supports the public render parameter “identifier”. The JSF controller that manages the senderPortletName view is called “senderPortletManagedBean”.
— Receiver portlet : A second portlet named “receiverPortletName” that also supports the public render parameter “identifier”. The JSF controller that manages the senderPortletName view is called “receiverPortletManagedBean”.
|
1 2 3 4 5 6 7 8 9 10 11 12 13 14 15 16 17 18 |
<portlet-app xmlns="http://java.sun.com/xml/ns/portlet/portlet-app_2_0.xsd" xmlns:xsi="http://www.w3.org/2001/XMLSchema-instance" xsi:schemaLocation="http://java.sun.com/xml/ns/portlet/portlet-app_2_0.xsd http://java.sun.com/xml/ns/portlet/portlet-app_2_0.xsd" version="2.0"> <portlet> <portlet-name>senderPortletName</portlet-name> ... <supported-public-render-parameter>identifier</supported-public-render-parameter> ... </portlet> <portlet> ... <portlet-name>receiverPortletName</portlet-name> ... <supported-public-render-parameter>identifier</supported-public-render-parameter> ... </portlet> </portlet-app> |
-
Send/Receive the public render parameter
With JSF Portlet, there is two ways to send and receive the public render parameter. The first one is by using a application-extension in the faces-config.xml. The second is by using the FacesContext actionReponse and renderRequest.
The following section will convers the two ways :
1- Using application extension in the faces-config.xml
Liferay provides the Liferay faces bridge that allows you to use the public render parameter mechanism by simple configuration in the faces-config.xml file. Below steps to follow :
- Adding the liferay-faces-bridge-2.0-extension namespace in the faces-config.xml
Open the faces-config.xml file of your application, and add the following namespace to your <faces-config> property :
|
1 |
xmlns:bridge="http://www.liferay.com/xml/ns/liferay-faces-bridge-2.0-extension" |
Your faces-config.xml must correspond to :
|
1 2 3 4 5 6 7 |
<?xml version="1.0"?> <faces-config version="2.1" xmlns="http://java.sun.com/xml/ns/javaee" xmlns:xsi="http://www.w3.org/2001/XMLSchema-instance" xsi:schemaLocation="http://java.sun.com/xml/ns/javaee http://java.sun.com/xml/ns/javaee/web-facesconfig_2_1.xsd" xmlns:bridge="http://www.liferay.com/xml/ns/liferay-faces-bridge-2.0-extension"> ... </faces-config> |
- Defining the public parameter bridge
Portlet 2.0 provides a bridge that maps a render parameter to a backing bean using settings in your faces-config.xml and portlet.xml. The backing bean should have a String attribute with getter and setter.
|
1 2 3 4 5 6 7 8 9 10 11 12 13 14 15 16 17 18 19 20 21 22 23 24 |
<?xml version="1.0"?> <faces-config version="2.1" xmlns="http://java.sun.com/xml/ns/javaee" xmlns:xsi="http://www.w3.org/2001/XMLSchema-instance" xsi:schemaLocation="http://java.sun.com/xml/ns/javaee http://java.sun.com/xml/ns/javaee/web-facesconfig_2_1.xsd" xmlns:bridge="http://www.liferay.com/xml/ns/liferay-faces-bridge-2.0-extension"> <lifecycle> <phase-listener>com.liferay.faces.util.lifecycle.DebugPhaseListener</phase-listener> </lifecycle> <application> <application-extension> <!-- Defining a public parameter mapping --> <bridge:public-parameter-mappings> <bridge:public-parameter-mapping> <parameter>senderPortletName:identifier</parameter> <model-el>#{senderPortletManagedBean.senderIdentifierAttribute}</model-el> </bridge:public-parameter-mapping> <bridge:public-parameter-mapping> <parameter>receiverPortletName:identifier</parameter> <model-el>#{receiverPortletManagedBean.receiverIdentifierAttribute}</model-el> </bridge:public-parameter-mapping> </bridge:public-parameter-mappings> </application-extension> </application> </faces-config> |
The public parameter “identifier” of the portlet “senderPortletName” will be mapped to the attribute “senderIdentifierAttribute” of the backing bean “senderPortletManagedBean”
The public parameter “identifier” of the portlet “receiverPortletName” will be mapped to the attribute “receiverIdentifierAttribute” of the backing bean “receiverPortletManagedBean“
- Processing the public render parameter in a bridge handler
You can define a bridge handler to process public render parameters. It can be done by creating a class that implements BridgePublicRenderParameterHandler as below :
|
1 2 3 4 5 6 7 |
public class CustomBridgePublicRenderParameterHandler implements BridgePublicRenderParameterHandler { @Override public void processUpdates(FacesContext facesContext) { // Process your public render parameters here... } } |
Once you implemented the BridgePublicRenderParameterHandler, all portlets that handle the public render parameter must define it in their portlet.xml as below :
|
1 2 3 4 5 6 7 8 9 10 11 12 13 14 15 16 17 18 19 20 21 22 23 24 |
<portlet-app ...> <portlet> <portlet-name>senderPortletName</portlet-name> ... <!-- bridgePublicRenderParameterHandler to process public render parameters --> <init-param> <name>javax.portlet.faces.bridgePublicRenderParameterHandler</name> <value>com.roufid.tutorials.bridge.customBridgePublicRenderParameterHandler</value> </init-param> ... <supported-public-render-parameter>identifier</supported-public-render-parameter> </portlet> <portlet> <portlet-name>receiverPortletName</portlet-name> ... <!-- bridgePublicRenderParameterHandler to process public render parameters --> <init-param> <name>javax.portlet.faces.bridgePublicRenderParameterHandler</name> <value>com.roufid.tutorials.bridge.customBridgePublicRenderParameterHandler</value> </init-param> ... <supported-public-render-parameter>identifier</supported-public-render-parameter> </portlet> </portlet-app> |
2- Using the FacesContext actionReponse and renderRequest
Another way to communicate between JSF Portlet using public render parameter is by using the portlet actionReponse and renderRequest. Below how to operate it :
- Sender portlet
In the processAction phase of the sender portlet, you can set a value to the defined public render parameter as following :
|
1 2 3 4 5 6 7 8 |
// Getting the faces context. FacesContext fc = FacesContext.getCurrentInstance(); // Getting the portlet action response. ActionResponse actionResponse = (ActionResponse) fc.getExternalContext().getResponse(); // Setting the public render parameter. actionReponse.setRenderParameter("identifier", value); |
- Receiver portlet
Retreiving the value of the public render parameter is done from the portlet renderRequest as following :
|
1 2 3 4 5 6 |
// Getting the portlet request. FacesContext fc = FacesContext.getCurrentInstance(); RenderRequest renderRequest = (RenderRequest) fc.getExternalContext().getRequest(); // Getting the value of the public render parameter from the portlet parameters. String value = renderRequest.getParameter("identifier"); |
Public render parameter can only be removed in processAction phase
The portal stores all public render parameters that are merged with regular parameters set in render URLs or on an ActionResponse.
Now you learned how to communicate between JSF portlets, let’s take a concrete example.
Concrete example
Let’s see a full example of using the IPC with public render parameter.
The code source is available on Github. Download the source
Let’s consider two portlets :
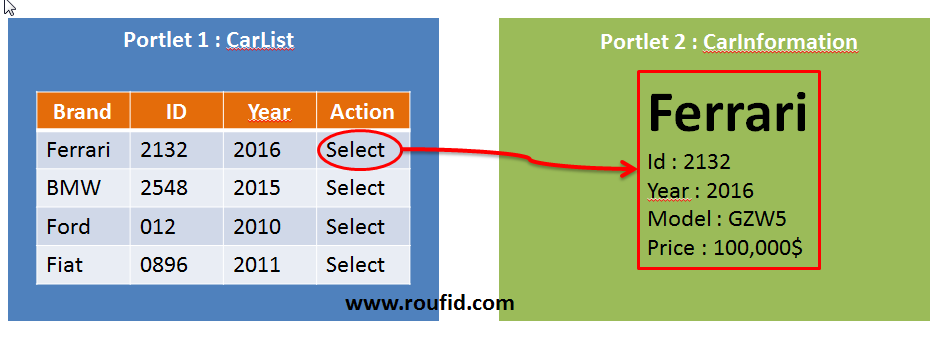
- CarList (Sender portlet): This portlet shows a list of cars. The user can select a car from the list. When the user select a car, the car’s id is setted in the public render parameter. The car information will be displayed in the second portlet.
- CarInformation (Receiver portlet): If a car is selected (Id stored in the public render parameter), this portlet will display the car information.
Defining the public render parameter
The first step is to define the public render parameter that will be fired and processed by portlets in the portlet.xml file. If the portlets that handle the public render parameter are in the same Liferay Plugin Project, so only one definition must be in the portlet.xml file. If not, each Liferay plugin project must declare it in its portlet.xml file.
In this example, the two portlets are in the same Liferay Plugin Project.
The public render parameter identifier is carId and below the definition :
|
1 2 3 4 5 6 7 8 9 10 11 |
<?xml version="1.0"?> <portlet-app xmlns="http://java.sun.com/xml/ns/portlet/portlet-app_2_0.xsd" xmlns:xsi="http://www.w3.org/2001/XMLSchema-instance" xsi:schemaLocation="http://java.sun.com/xml/ns/portlet/portlet-app_2_0.xsd http://java.sun.com/xml/ns/portlet/portlet-app_2_0.xsd" version="2.0"> <!-- Defining the public render parameter --> <public-render-parameter> <identifier>carId</identifier> <qname xmlns:x="http://roufid.com/carId">x:carId</qname> </public-render-parameter> </portlet-app> |
Sender portlet : CarList
- Defining the CarList portlet in the portlet.xml file
The CarList portlet will handle the public render parameter “carId“. It must define the <supported-public-render-parameter> property :
|
1 2 3 4 5 6 7 8 9 10 11 12 13 14 15 16 17 18 19 20 21 22 23 24 25 26 27 28 29 30 31 32 33 34 35 36 37 38 39 40 41 |
<portlet> <portlet-name>CarList</portlet-name> <display-name>CarList</display-name> <portlet-class> javax.portlet.faces.GenericFacesPortlet </portlet-class> <init-param> <name>javax.portlet.faces.defaultViewId.view</name> <value>/views/carlist/view.xhtml</value> </init-param> <!-- You can optionally declare a bridgePublicRenderParameterHandler to process public render parameters --> <init-param> <name>javax.portlet.faces.bridgePublicRenderParameterHandler</name> <value>com.roufid.tutorials.bridge.CarBridgePublicRenderParameterHandler</value> </init-param> <expiration-cache>0</expiration-cache> <supports> <mime-type>text/html</mime-type> <portlet-mode>view</portlet-mode> </supports> <portlet-info> <title>CarList</title> <short-title>CarList</short-title> <keywords></keywords> </portlet-info> <security-role-ref> <role-name>administrator</role-name> </security-role-ref> <security-role-ref> <role-name>guest</role-name> </security-role-ref> <security-role-ref> <role-name>power-user</role-name> </security-role-ref> <security-role-ref> <role-name>user</role-name> </security-role-ref> <!-- CarList portlet supports the public render parameter "carId" --> <supported-public-render-parameter>carId</supported-public-render-parameter> </portlet> |
- Creating an attribute in the managed bean
Creating an attribute of type String in the sender portlet view controller with getter and setter which will be mapped to the defined public render parameter.
|
1 2 3 4 5 6 7 8 9 10 11 12 13 14 15 16 17 18 19 20 21 22 23 24 25 26 27 |
/** * Listing cars. * * @author Radouane ROUFID * */ @ManagedBean @ViewScoped public class CarListMB { private String selectedCarId; /** * @return the selectedCarId */ public String getSelectedCarId() { return selectedCarId; } /** * @param selectedCarId * the selectedCarId to set */ public void setSelectedCarId(String selectedCarId) { this.selectedCarId = selectedCarId; } } |
- Selecting a car
The car selection is done by calling from the facet the method selectCar of the controller. Below the XHTML code :
|
1 2 3 4 5 6 7 8 9 10 11 12 13 14 15 16 17 18 19 20 21 22 23 |
<h:form> <p:messages autoUpdate="true" /> <p:dataTable var="car" value="#{carListMB.cars}"> <p:column> <p:graphicImage url="#{car.imagePath}" width="50" height="50" /> </p:column> <p:column headerText="Id"> <h:outputText value="#{car.id}" /> </p:column> <p:column headerText="Year"> <h:outputText value="#{car.year}" /> </p:column> <p:column headerText="Brand"> <h:outputText value="#{car.brand}" /> </p:column> <p:column headerText="Color"> <h:outputText value="#{car.color}" /> </p:column> <p:column headerText="Action"> <p:commandButton value="Select" actionListener="#{carListMB.selectCar(car.id)}" ajax="false" /> </p:column> </p:dataTable> </h:form> |
In the method selectCar, we set the selected car identifier to the attribute selectedCarId. Below the code :
|
1 2 3 4 5 6 7 8 9 10 11 12 13 14 15 16 17 18 19 20 21 22 23 24 25 26 27 28 29 30 31 32 33 34 35 36 37 38 |
/** * Listing cars. * * @author Radouane ROUFID * */ @ManagedBean @ViewScoped public class CarListMB { private String selectedCarId; /** * Store the car's identifier in the session. * * @param carId * Car's identifier. */ public void selectCar(final String carId) { System.out.println("Selected car id = " + carId); selectedCarId = carId; } /** * @return the selectedCarId */ public String getSelectedCarId() { return selectedCarId; } /** * @param selectedCarId * the selectedCarId to set */ public void setSelectedCarId(String selectedCarId) { this.selectedCarId = selectedCarId; } } |
We must now map the public render parameter to the selectedCarId attribute in the faces-config.xml
- Mapping the public render parameter with the backing bean attribute
In the faces-config.xml file, add the following mapping :
|
1 2 3 4 5 6 7 8 9 10 11 12 13 14 15 16 17 18 19 20 21 |
<?xml version="1.0"?> <faces-config version="2.1" xmlns="http://java.sun.com/xml/ns/javaee" xmlns:xsi="http://www.w3.org/2001/XMLSchema-instance" xsi:schemaLocation="http://java.sun.com/xml/ns/javaee http://java.sun.com/xml/ns/javaee/web-facesconfig_2_1.xsd" xmlns:bridge="http://www.liferay.com/xml/ns/liferay-faces-bridge-2.0-extension"> <lifecycle> <phase-listener>com.liferay.faces.util.lifecycle.DebugPhaseListener</phase-listener> </lifecycle> <application> <application-extension> <bridge:public-parameter-mappings> <bridge:public-parameter-mapping> <!-- the public render parameter of the portlet CarList will correspond to #{carListMB.selectedCarId} --> <parameter>CarList:carId</parameter> <model-el>#{carListMB.selectedCarId}</model-el> </bridge:public-parameter-mapping> </bridge:public-parameter-mappings> </application-extension> </application> </faces-config> |
Receiver portlet : CarInformation
- Defining the CarInformation portlet in the portlet.xml file
The CarInformation portlet will handle the public render parameter “carId“. It must define the <supported-public-render-parameter> property :
|
1 2 3 4 5 6 7 8 9 10 11 12 13 14 15 16 17 18 19 20 21 22 23 24 25 26 27 28 29 30 31 32 33 34 35 36 37 38 39 40 41 |
<portlet> <portlet-name>CarInformation</portlet-name> <display-name>CarInformation</display-name> <portlet-class> javax.portlet.faces.GenericFacesPortlet </portlet-class> <init-param> <name>javax.portlet.faces.defaultViewId.view</name> <value>/views/carinformation/view.xhtml</value> </init-param> <!-- You can optionally declare a bridgePublicRenderParameterHandler to process public render parameters --> <init-param> <name>javax.portlet.faces.bridgePublicRenderParameterHandler</name> <value>com.roufid.tutorials.bridge.CarBridgePublicRenderParameterHandler</value> </init-param> <expiration-cache>0</expiration-cache> <supports> <mime-type>text/html</mime-type> <portlet-mode>view</portlet-mode> </supports> <portlet-info> <title>CarInformation</title> <short-title>CarInformation</short-title> <keywords></keywords> </portlet-info> <security-role-ref> <role-name>administrator</role-name> </security-role-ref> <security-role-ref> <role-name>guest</role-name> </security-role-ref> <security-role-ref> <role-name>power-user</role-name> </security-role-ref> <security-role-ref> <role-name>user</role-name> </security-role-ref> <!-- CarInformation portlet supports the public render parameter "carId" --> <supported-public-render-parameter>carId</supported-public-render-parameter> </portlet> |
- Creating an attribute in the managed bean
Creating an attribute of type String in the sender portlet view controller with getter and setter which will be mapped to the defined public render parameter.
|
1 2 3 4 5 6 7 8 9 10 11 12 13 14 15 16 17 18 19 20 21 22 23 24 25 26 27 |
/** * Listing cars. * * @author Radouane ROUFID * */ @ManagedBean @ViewScoped public class CarInformationMB{ private String selectedCarId; /** * @return the selectedCarId */ public String getSelectedCarId() { return selectedCarId; } /** * @param selectedCarId * the selectedCarId to set */ public void setSelectedCarId(String selectedCarId) { this.selectedCarId = selectedCarId; } } |
- Getting the selected car
When rendering the portlet view, the selectedCarId attribute will be setted by the value of the public render parameter.
|
1 2 3 4 5 6 7 8 9 10 11 12 13 14 15 16 17 18 19 20 21 22 23 24 25 26 27 28 29 30 31 32 33 34 35 36 37 38 39 40 41 42 43 44 45 46 47 48 49 50 51 52 53 54 55 56 57 58 59 60 61 62 63 64 65 66 67 68 69 70 |
/** * Car information ManagedBean. * * @author Radouane ROUFID. * */ @ManagedBean @ViewScoped public class CarInformationMB { /** * Car. */ private Car car; /** * Car service. */ @ManagedProperty("#{carService}") private CarService service; private String selectedCarId; /** * @return the selectedCarId */ public String getSelectedCarId() { return selectedCarId; } /** * This method will be called by the bridge when a car is selected * * @param selectedCarId * the selectedCarId to set */ public void setSelectedCarId(String selectedCarId) { this.selectedCarId = selectedCarId; // Getting the car corresponding to the carId. car = service.getCarById(selectedCarId); } /** * @return the car */ public Car getCar() { return car; } /** * @param car * the car to set */ public void setCar(Car car) { this.car = car; } /** * @return the service */ public CarService getService() { return service; } /** * @param service * the service to set */ public void setService(CarService service) { this.service = service; } } |
We must now map the public render parameter to the selectedCarId attribute in the faces-config.xml
- Mapping the public render parameter with the backing bean attribute
In the faces-config.xml file, add the following mapping :
|
1 2 3 4 5 6 7 8 9 10 11 12 13 14 15 16 17 18 19 20 21 22 23 |
<?xml version="1.0"?> <faces-config version="2.1" xmlns="http://java.sun.com/xml/ns/javaee" xmlns:xsi="http://www.w3.org/2001/XMLSchema-instance" xsi:schemaLocation="http://java.sun.com/xml/ns/javaee http://java.sun.com/xml/ns/javaee/web-facesconfig_2_1.xsd" xmlns:bridge="http://www.liferay.com/xml/ns/liferay-faces-bridge-2.0-extension"> <lifecycle> <phase-listener>com.liferay.faces.util.lifecycle.DebugPhaseListener</phase-listener> </lifecycle> <application> <application-extension> <bridge:public-parameter-mappings> <bridge:public-parameter-mapping> <parameter>CarList:carId</parameter> <model-el>#{carListMB.selectedCarId}</model-el> </bridge:public-parameter-mapping> <bridge:public-parameter-mapping> <parameter>CarInformation:carId</parameter> <model-el>#{carInformationMB.selectedCarId}</model-el> </bridge:public-parameter-mapping> </bridge:public-parameter-mappings> </application-extension> </application> </faces-config> |
Rendering after deployment
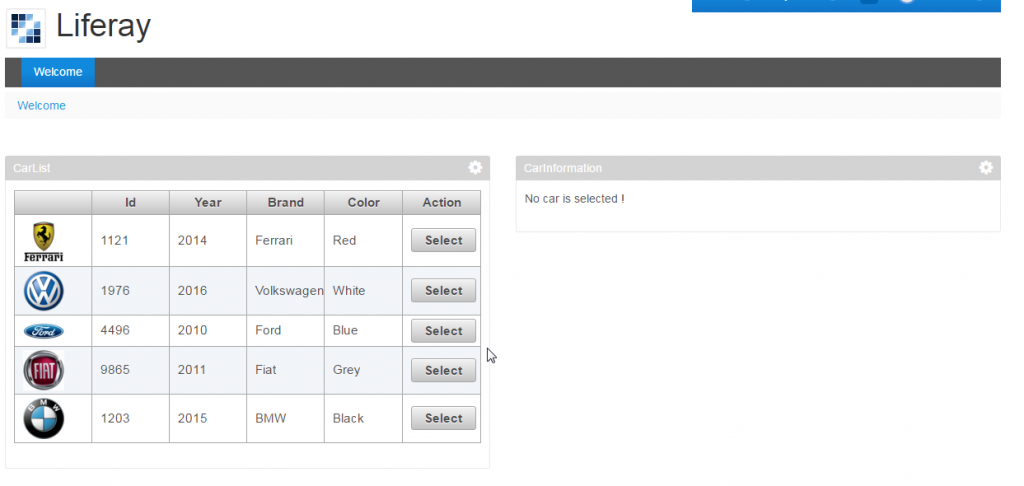
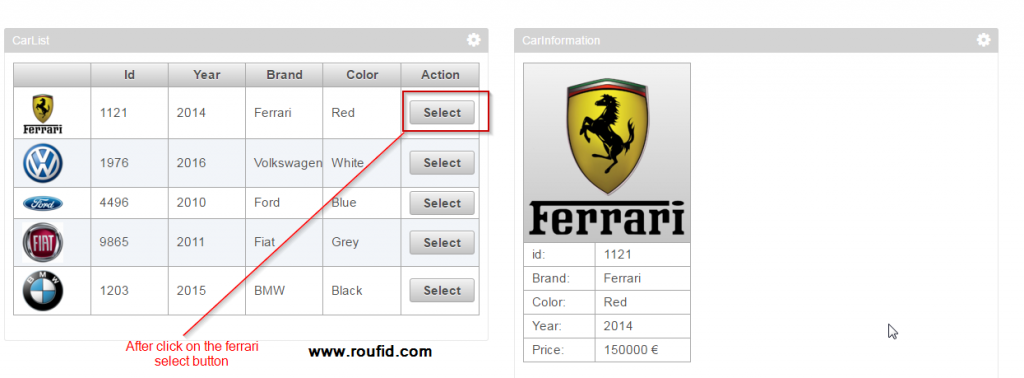
The CarList portlet is on the left. CarInformation portlet is on the right.
Below the result after selecting Ferrari car.
The code source is available on Github. Download the source


