
Table of contents
Introduction
Once a portlet is placed on a portal page, its data is not directly shared with other portlets. IPC (Inter Portlet Communication) defines the ways that a Portlet can interact and communicate with another Portlet. There are four ways to make inter portlet communication :
In this post, we will see how to communicate between JSF portlets using events.
If you are interested in portlet communication between none-JSF portlets, this article may interest you.
Events
JSR 286 (Portlet 2.0) introduced portlet communication using events. Due to JSF life cycle communication between JSF portlets is made differently in comparison to MVCPortlet.
There is no direct alignement between Portlet event phase and any JSF lifecycle phase. Javax.portlet specification introduced an event bridge to process portlet events. Below steps to follow to make a JSF Portlet communication using events:
-
Defining the event in the Portlet.xml
The first step is to define the event that will be fired and processed by portlets. The definition is set in the portlet configuration file Portlet.xml. Below the declaration:
|
1 2 3 4 |
<event-definition xmlns:event="http://www.namespace.com"> <qname>identifier</qname> <value-type>java.lang.String</value-type> </event-definition> |
Xmlns : Give a namespace to the event
Qname : Give a unique identifier in the namespace
Value-type : Type of object the event will transfere
-
Create a bridge event handler
To handle portlet events, you must create a custom bridge event handler which will process all events fired by portlets that defined it. In fact, you must create a Java class that implements the handleEvent method of javax.portlet.faces.BridgeEventHandler interface as below :
|
1 2 3 4 5 6 7 8 9 10 11 12 |
public class CustomBridgeEventHandler implements BridgeEventHandler { @Override public EventNavigationResult handleEvent(FacesContext facesContext, Event event) { EventNavigationResult eventNavigationResult = null; // Processing the event will be written here... return eventNavigationResult; } } |
The handleEvent method takes two parameters :
FacesContext : The current instance of the JSF context
Event : The fired event
We will implement this method to process the event in the receiver portlet.
-
Sender portlet
Declare that the sender portlet is publishing the defined event in portlet.xml
To send the event, the portlet must specify that it’s publishing it. Add in portlet.xml file the <supported-publishing-event> property that refers to the event identifier. Example:
|
1 2 3 4 5 6 7 |
<portlet> ... <supported-publishing-event xmlns:event="http://www.namespace.com"> <qname>identifier</qname> </supported-publishing-event> ... </portlet> |
Xmlns must be the same as the event definition. Same for the event identifier.
Declare the custom bridge handler in the portlet.xml
The event sender portlet must register the custom bridge event handler that will process the event. To do so, you must give the fully qualified name of the bridge event handler created in the previous section. Let’s consider that it is located in the package : com.roufid.tutorials.bridge. Below the configuration :
|
1 2 3 4 5 6 7 8 |
<portlet> ... <init-param> <name>javax.portlet.faces.bridgeEventHandler</name> <value>com.roufid.tutorials.bridge.CustomBridgeEventHandler</value> </init-param> ... </portlet> |
Firing the event
Firing event from the sender portlet is done by using QName class that refers to the defined event by giving its namespace and identifier.
|
1 2 3 4 5 6 7 8 9 10 11 |
public void yourMethod() { // Getting the faces context. FacesContext fc = FacesContext.getCurrentInstance(); // Getting the portlet action response. ActionResponse actionReponse = (ActionResponse) fc.getExternalContext().getResponse(); // Firing the event QName qName = new QName("http://www.namespace.com ", "identifier"); actionReponse.setEvent(qName, dataYouWantToSend); } |
Use the same event namespace and identifier given in the portlet.xml.
-
Receiver portlet
Declare that the portlet is processing the defined event in portlet.xml
The receiver portlet must declare that it’s processing the defined event by adding the property <supported-processing-event> in the portlet.xml
|
1 2 3 |
<supported-processing-event> <qname xmlns:x="http://www.namespace.com">identifier</qname> </supported-processing-event> |
Declare the custom bridge handler in the portlet.xml
Same as the sender portlet, the receiver portlet must register the custom bridge event handler. Define the same configuration :
|
1 2 3 4 5 6 7 8 |
<portlet> ... <init-param> <name>javax.portlet.faces.bridgeEventHandler</name> <value>com.roufid.tutorials.bridge.CustomBridgeEventHandler</value> </init-param> ... </portlet> |
Processing the fired event in the CustomBridgeEventHandler
Processing the fired event is done in the CustomBridgeEventHandler you created previously. Since this CustomBridgeEventHandler is processing all fired events you must distinguish them. To do so, you can check the fired event QName as below :
|
1 2 3 4 5 6 7 8 9 10 11 12 13 14 15 16 17 18 19 20 21 |
public class CustomBridgeEventHandler implements BridgeEventHandler { @Override public EventNavigationResult handleEvent(FacesContext facesContext, Event event) { EventNavigationResult eventNavigationResult = null; String eventQName = event.getQName().toString(); // Processing the defined event. if (eventQName.equals("{http://www.namespace.com}identifier")) { // Getting the event value. String value = (String) event.getValue(); // Do what ever you want here... } return eventNavigationResult; } } |
Now you learned how to communicate between JSF portlets, let’s take a concrete example.
Concrete example
Let’s see a full example of using the JSF IPC using event.
The code source is available on Github. Download the source
Let’s consider two portlets :
- CarList (Sender Portlet): This portlet shows a list of cars. The user can select a car from the list. When the user select a car, an event will be fired with the selected car identifier. The car information will be displayed in the second portlet.
- CarInformation (Receiver Portlet): If an event is fired, it will be processed in the second portlet which will display the car information.
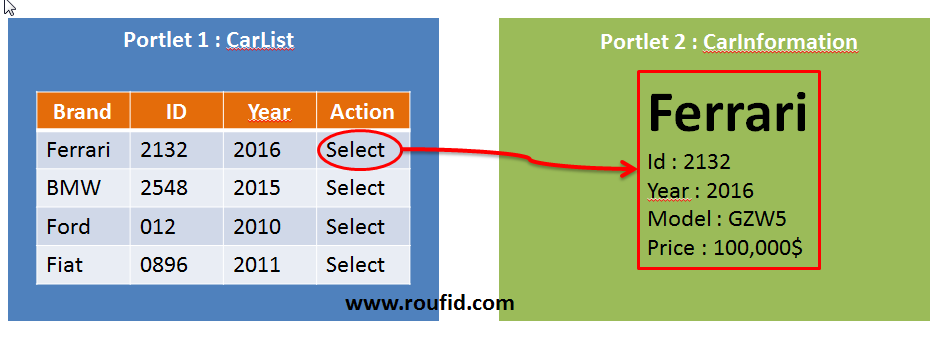
JSF portlet communication using event
Defining the event
The first step is to define the event that will be fired and processed by portlets in the portlet.xml file. If the portlets that handle the event are in the same Liferay Plugin Project, so only one definition of the event must be in the portlet.xml file. If not, each Liferay plugin project must declare it in its portlet.xml file.
In this example, the two portlets are in the same Liferay Plugin Project.
The event that will be fired and processed will be called “selectCarEvent” and will store the car identifier which is a java.lang.String. The declaration is as following :
|
1 2 3 4 5 |
<!-- Defining the event --> <event-definition xmlns:event="http://www.roufid.com"> <qname>event:selectCarEvent</qname> <value-type>java.lang.String</value-type> </event-definition> |
Defining the event handler : CarBridgeEventHandler
Below the bridge that will handle portlet events.
|
1 2 3 4 5 6 7 8 9 10 11 12 13 14 15 16 17 |
/** * Event handler which will process all Portlet events. * * @author Radouane ROUFID. * */ public class CarBridgeEventHandler implements BridgeEventHandler { @Override public EventNavigationResult handleEvent(FacesContext facesContext, Event event) { EventNavigationResult eventNavigationResult = null; // Processing the event will be here... return eventNavigationResult; } } |
Sender portlet : CarList
- Portlet.xml
Defining the CarList portlet in the portlet.xml file. This portlet will publish the “selectCarEvent” event. It must define the <supported-publishing-event> property :
|
1 2 3 4 5 6 7 8 9 10 11 12 13 14 15 16 17 18 19 20 21 22 23 24 25 26 27 28 29 30 31 32 33 34 35 36 37 38 39 40 41 42 |
<portlet> <portlet-name>CarList</portlet-name> <display-name>CarList</display-name> <portlet-class> javax.portlet.faces.GenericFacesPortlet </portlet-class> <init-param> <name>javax.portlet.faces.defaultViewId.view</name> <value>/views/carlist/view.xhtml</value> </init-param> <!-- Defining the Bridge event handler. --> <init-param> <name>javax.portlet.faces.bridgeEventHandler</name> <value>com.roufid.tutorials.bridge.CarBridgeEventHandler</value> </init-param> <expiration-cache>0</expiration-cache> <supports> <mime-type>text/html</mime-type> <portlet-mode>view</portlet-mode> </supports> <portlet-info> <title>CarList</title> <short-title>CarList</short-title> <keywords></keywords> </portlet-info> <security-role-ref> <role-name>administrator</role-name> </security-role-ref> <security-role-ref> <role-name>guest</role-name> </security-role-ref> <security-role-ref> <role-name>power-user</role-name> </security-role-ref> <security-role-ref> <role-name>user</role-name> </security-role-ref> <!-- The carList portlet will publish the event --> <supported-publishing-event xmlns:event="http://www.roufid.com"> <qname>event:selectCarEvent</qname> </supported-publishing-event> </portlet> |
- Selecting the car
Firing the event
|
1 2 3 4 5 6 7 8 9 10 11 12 13 14 15 16 17 18 |
/** * Firing the event with the selected car identifier. * * @param carId * Selected car identifier. */ public void selectCar(final String carId) { System.out.println("Selected car id = " + carId); // Getting the faces context. FacesContext fc = FacesContext.getCurrentInstance(); // Getting the portlet action response. ActionResponse actionResponse = (ActionResponse) fc.getExternalContext().getResponse(); // Firing the event : selectCarEvent with the carId. QName qname = new QName("http://www.roufid.com", "selectCarEvent", "event"); actionResponse.setEvent(qname, carId); } |
Receiver portlet : CarInformation
- Portlet.xml
Defining the CarInformation portlet in the portlet.xml file. This portlet will process the “SelectCarEvent” event. It must define the <supported-processing-event> property :
|
1 2 3 4 5 6 7 8 9 10 11 12 13 14 15 16 17 18 19 20 21 22 23 24 25 26 27 28 29 30 31 32 33 34 35 36 37 38 39 40 41 42 |
<portlet> <portlet-name>CarInformation</portlet-name> <display-name>CarInformation</display-name> <portlet-class> javax.portlet.faces.GenericFacesPortlet </portlet-class> <init-param> <name>javax.portlet.faces.defaultViewId.view</name> <value>/views/carinformation/view.xhtml</value> </init-param> <!-- Defining the Bridge event handler. --> <init-param> <name>javax.portlet.faces.bridgeEventHandler</name> <value>com.roufid.tutorials.bridge.CarBridgeEventHandler</value> </init-param> <expiration-cache>0</expiration-cache> <supports> <mime-type>text/html</mime-type> <portlet-mode>view</portlet-mode> </supports> <portlet-info> <title>CarInformation</title> <short-title>CarInformation</short-title> <keywords></keywords> </portlet-info> <security-role-ref> <role-name>administrator</role-name> </security-role-ref> <security-role-ref> <role-name>guest</role-name> </security-role-ref> <security-role-ref> <role-name>power-user</role-name> </security-role-ref> <security-role-ref> <role-name>user</role-name> </security-role-ref> <!-- The carInformation portlet will process the event --> <supported-processing-event xmlns:event="http://www.roufid.com"> <qname>event:selectCarEvent</qname> </supported-processing-event> </portlet> |
- Processing the event
The event is processed in the CarBridgeEventHandler
|
1 2 3 4 5 6 7 8 9 10 11 12 13 14 15 16 17 18 19 20 21 22 23 24 25 26 27 28 29 30 31 32 33 34 35 36 37 38 39 40 |
/** * Event handler which will process all Portlet events. * * @author Radouane ROUFID. * */ public class CarBridgeEventHandler implements BridgeEventHandler { @Override public EventNavigationResult handleEvent(FacesContext facesContext, Event event) { EventNavigationResult eventNavigationResult = null; String eventQName = event.getQName().toString(); // Processing the selectCarEvent. if (eventQName.equals("{http://www.roufid.com}selectCarEvent")) { // Getting the event value. String carId = (String) event.getValue(); // Getting the managed bean : carInformationMB and setting the carId. CarInformationMB carInformationMB = getCarInformationMB(facesContext); carInformationMB.selectCarById(carId); } return eventNavigationResult; } /** * Getting the managed bean CarInformation from the facesContext. * * @param facesContext * JSF faces context. * @return The carInformation managed bean. */ private CarInformationMB getCarInformationMB(FacesContext facesContext) { ELContext elContext = facesContext.getELContext(); ValueExpression valueExpression = facesContext.getApplication().getExpressionFactory().createValueExpression(elContext, "#{carInformationMB}", CarInformationMB.class); return (CarInformationMB) valueExpression.getValue(elContext); } } |
Rendering after deployment
The CarList portlet is on the left. CarInformation portlet is on the right.
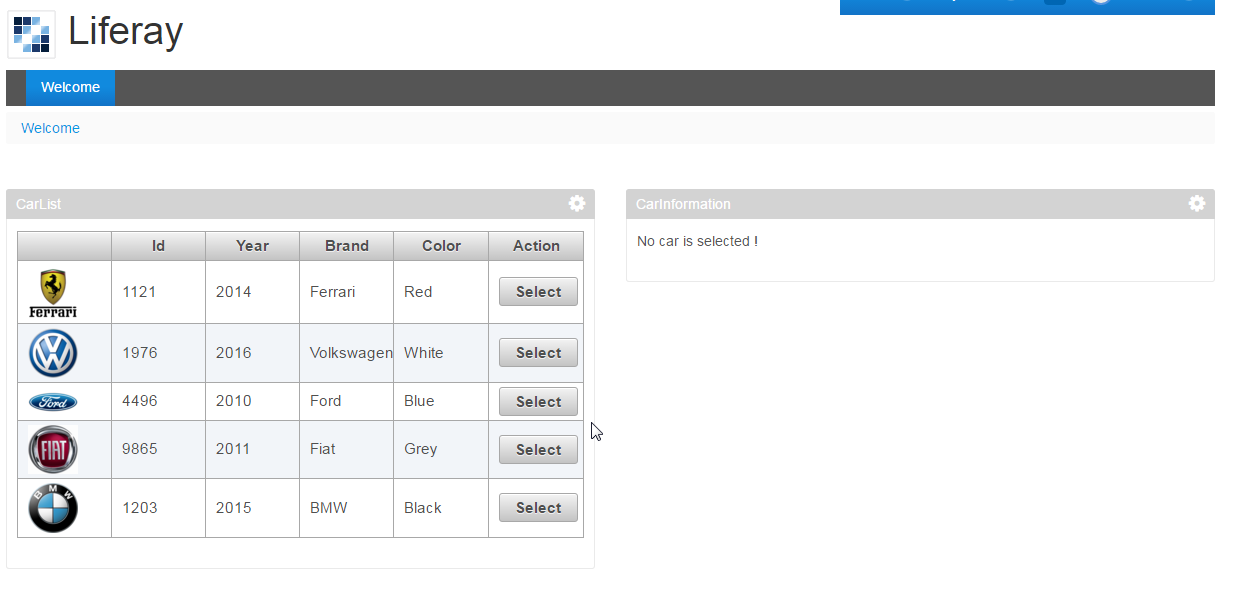
Liferay JSF portlet communication using event – Before choosing a car
Below the result after selecting Ferrari car.
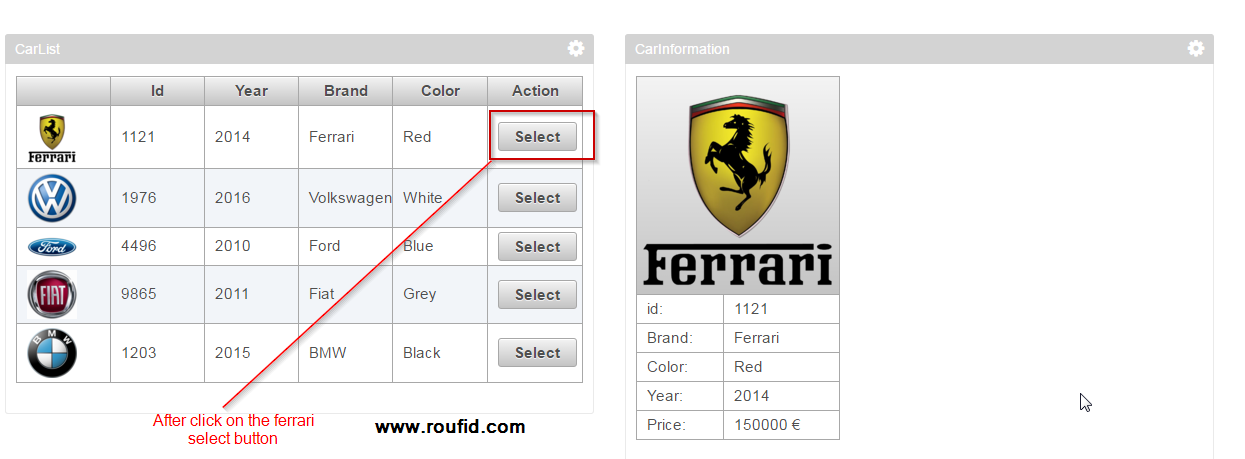
Liferay JSF portlet communication using event – After choosing a car
The code source is available on Github. Download the source