
By default, Liferay use hsql (hypersonic) database which is not recommanded to go with in production environment. Liferay provides a very easy way to use another SGBD on your portal by simple configuration. In this tutorial, we will see how to switch up to one of the following SGBD:
Table of contents
In brief:
In general, the changeover to the new SGBD is following these next steps:
- Downloading the appropriate JDBC driver and putting it under the library folder of your server
- Creating a blank database encoded for character set UTF-8
- Setting up the connection information in the portal-ext.properties file by filling the following properties
1234jdbc.default.driverClassName= The jdbc driver class namejdbc.default.url= The url to your databasejdbc.default.username= The database loginjdbc.default.password= The database password
Prerequisites:
In this tutorial, we will use Tomcat as server. We will refer to the tomcat server location as $TOMCAT_HOME. If you are using another server, $TOMCAT_HOME will corresponds to the folder where your server’s library folder is located.
The portal-ext.properties file where we will set up the connection information is located in the same folder as your $TOMCAT_HOME. If it doesn’t exist, create it.

1- MySQL
To configure your Liferay portal with MySQL SGBD, follow these instructions :
- Downloading the jdbc Driver
For MySQL, there is no need to download the jdbc driver. When Liferay detects you want to use MySQL, it will automatically include the driver (mysql.jar) in your $TOMCAT_HOME/lib/ext.
- Creating the blank database
Create a blank database using the UTF-8 encoding and give it a name. Let’s consider that the created database is “lportal”.
- Updating portal-ext.properties
Open your portal-ext.properties file and past the following lines :
|
1 2 3 4 5 |
# MySQL jdbc.default.driverClassName=com.mysql.jdbc.Driver jdbc.default.url=jdbc:mysql://localhost/lportal?useUnicode=true&characterEncoding=UTF-8&useFastDateParsing=false jdbc.default.username=root jdbc.default.password=root |
Set the correct username and password to connect to your database.
- Check the configuration
During the server start, you can check that Liferay started with the appropriate dialect by looking for the following lines in your server log console/file:
|
1 2 |
14:23:20,480 INFO [localhost-startStop-1][DialectDetector:71] Determine dialect for MySQL 5 14:23:20,574 INFO [localhost-startStop-1][DialectDetector:136] Found dialect org.hibernate.dialect.MySQLDialect |
If you go back to your database, you will see that it’s now populated by about 180 data tables that Liferay created on startup.
If you already configured your portal with hsql and want to re-configured it with the MySQL Database and add samples data, open portal-setup-wizard.properties file located in the same folder as portal-ext.properties. Set the setup.wizard.enabled to true and restart your server.
2- PostgreSQL
In this part, we will see how to use Liferay with PostgreSQL database.
- Downloading the jdbc Driver
Same as MySQL. Liferay provides automatically the postgreSQL driver jar. So there is no need to download it.
- Creating the blank database
Create a blank database and give it a name. Let’s consider that the created database is “lportal”.
- Updating portal-ext.properties
Open your portal-ext.properties file and past the following lines :
|
1 2 3 4 5 |
# PostgreSQL jdbc.default.driverClassName=org.postgresql.Driver jdbc.default.url= jdbc:postgresql://localhost:5432/lportal jdbc.default.username=postgres jdbc.default.password=postgres |
- Check the configuration
You can verify that Liferay started with the correct dialect (PostgreSQL) by looking for the following line in your server log console/file:
|
1 2 |
14:25:12,441 INFO [localhost-startStop-1][DialectDetector:71] Determine dialect for PostgreSQL 9 14:25:12,489 INFO [localhost-startStop-1][DialectDetector:136] Found dialect org.hibernate.dialect.PostgreSQLDialect |
3- DerbyDB
You can also configure Liferay to use Apache DerbyDB Database.
- Downloading the jdbc Driver
Liferay don’t provide natively a DerbyDB jdbc Driver. You must download it. Follow these instructions to download it :
- Go to the official Apache Derby db download page
- Click on the appropriate latest official release
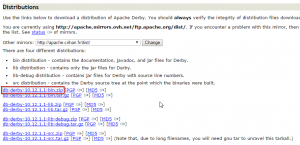
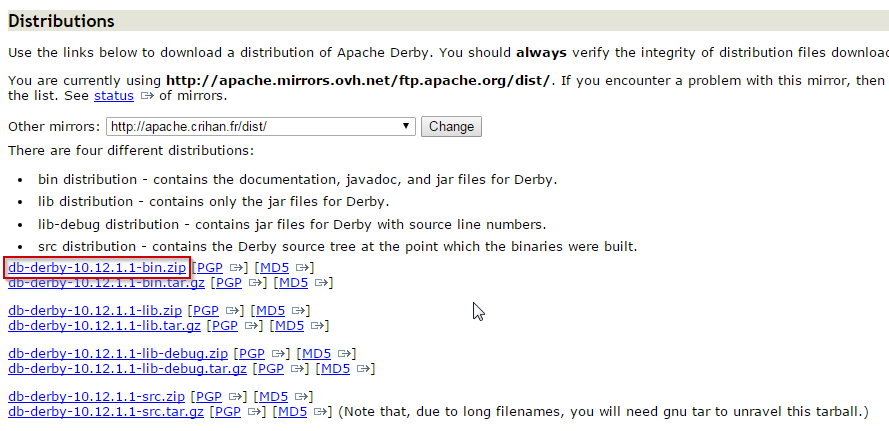
- On the distributions part, click on the db-derby-***-bin.zip link as shown below :
- Unzip the downloaded archive and navigate to “lib” folder
- Copy derby.jar and past it under $TOMCAT_HOME/lib/ext
- Creating the blank database
Connect to your derbyDB and create a database called lportal. You can do it by following these commands :
- Open a command terminal and navigate to the folder where you want to create your database. In our example, I will create a database under C:\dev\derbyDB. So in your prompt, tape :
1cd C:\dev\derbyDB - Launch the ij tool by taping :
1java org.apache.derby.tools.ij - Create a lportal database by taping :
1connect 'jdbc:derby:lportal;create=true';
- Updating portal-ext.properties
Open your portal-ext.properties file and fill with this information:
|
1 2 3 4 5 |
# DerbyDB jdbc.default.driverClassName=org.apache.derby.jdbc.EmbeddedDriver jdbc.default.url=jdbc:derby:lportal jdbc.default.username=sysdba jdbc.default.password=masterkey |
The default login/password of an Apache Derby Database are sysdba/masterkey.
- Adding the JVM Argument
With Apache Derby database, we have to tell the server where the database is located. To do that, add the VM argument -Dderby.system.home=”<YOUR_DERBY_DATABASE_LOCATION>” to your jvm.
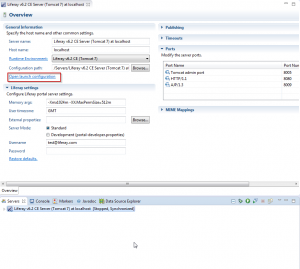
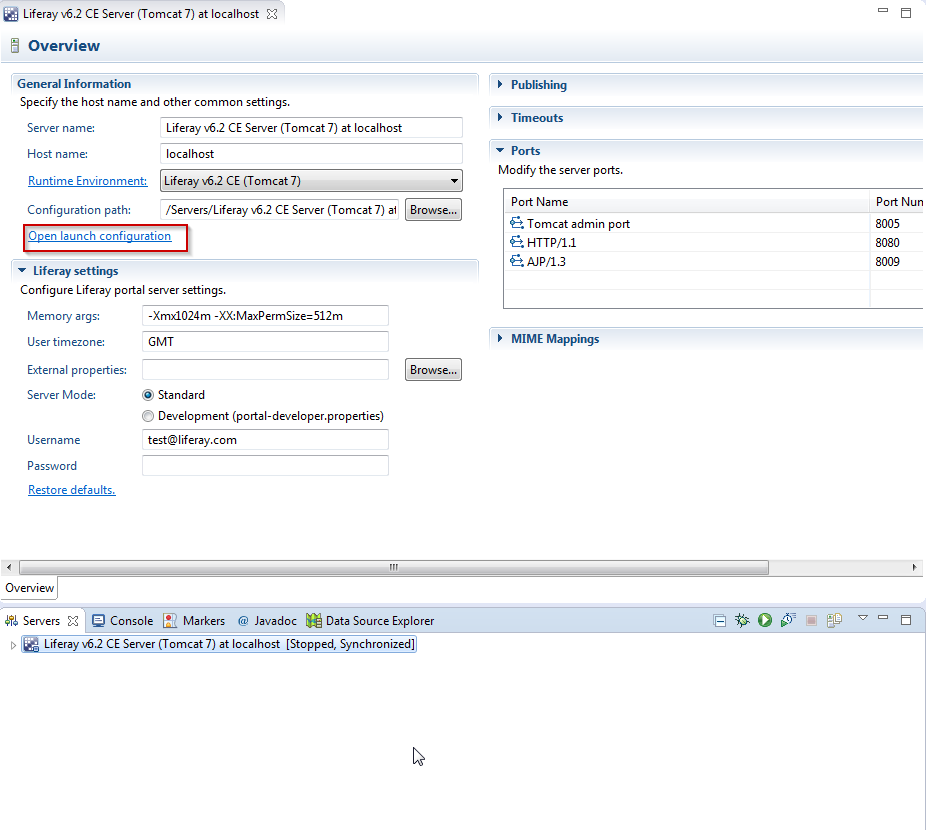
If you are handling your server under Eclipse, follow these instructions :
- On the server view, Double click on your server
- On the “Overview” window, under “General Information”, click on “Open launch configuration”
 3. Go to “Arguments” tab, and in the “VM arguments” section, add this line :
1-Dderby.system.home=”<YOUR_DERBY_DATABASE_LOCATION>”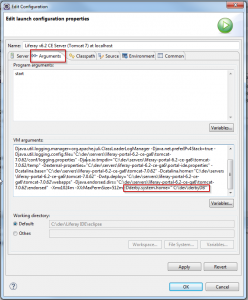

Important: Don’t use ” \” or ”/” in the end of path to your database.
- Check the configuration:
You can verify that Liferay started with the correct dialect (Apache Derby) by looking for the following line in your server log console/file:
|
1 2 |
21:29:04,296 INFO [localhost-startStop-1][DialectDetector:71] Determine dialect for Apache Derby 10 21:29:04,357 INFO [localhost-startStop-1][DialectDetector:136] Found dialect org.hibernate.dialect.DerbyDialect |
4- DB2
Liferay can also be used with a DB2 database. Below the instructions:
- Downloading the jdbc Driver
To download the DB2 jdbc Driver, follow these instructions :
- Go to the official IBM site
- Choose the appropriate driver version according to your DB2 Version. I’m using DB2 10.5, so the appropriate JDBC Driver is 3.6646. Click on the appropriate version
- On the next window, select the IBM Data Server Driver for JDBC and click on “Continue”
- If you don’t have an IBM Identity, you must sign up
- At the end of the process, you must have an archive named v**.****_jdbc_sqlj.tar.gz. Download it
- Unzip the gz archive, you will have another archive called v**.****_jdbc_sqlj.tar.
- Unzip the tar archive, you will have jdbc_sqlj folder under which you have another archive called db2_db2driver_for_jdbc_sqlj.zip
- Unzip the db2_db2driver_for_jdbc_sqlj.zip (the last unzipping, i promise)
- Copy the db2jcc.jar and past it under $TOMCAT_HOME/lib/ext
- Creating the blank database
Create now the blank database called lportal. Below the command to do it :
|
1 |
db2 => create database lportal; |
- Updating portal-ext.properties
|
1 2 3 4 5 |
#DB2 jdbc.default.driverClassName=com.ibm.db2.jcc.DB2Driver jdbc.default.url=jdbc:db2://localhost:50000/lportal:deferPrepares=false;fullyMaterializeInputStreams=true;fullyMaterializeLobData=true;progresssiveLocators=2;progressiveStreaming=2; jdbc.default.username=db2admin jdbc.default.password=admin |
- Check the configuration
You can verify that Liferay started with the correct dialect (DB2) by looking for the following line in your server log console/file:
|
1 2 |
14:57:09,239 INFO [localhost-startStop-1][DialectDetector:71] Determine dialect for DB2/NT64 10 14:57:09,302 INFO [localhost-startStop-1][DialectDetector:136] Found dialect com.liferay.portal.dao.orm.hibernate.DB2Dialect |
5- Oracle
Below how to configure Liferay with Oracle database.
- Downloading the jdbc Driver
- Go the official Oracle site, accept license agreement and download the ojdbc6.jar jdbc Driver
- Copy it and past it under $TOMCAT_HOME/lib/ext
- Creating the blank database
Create a blank database called lportal. This article may interest you : Here.
- Updating portal-ext.properties
|
1 2 3 4 5 |
# Oracle jdbc.default.driverClassName=oracle.jdbc.driver.OracleDriver jdbc.default.url=jdbc:oracle:thin:@localhost:1521:xe jdbc.default.username=lportal jdbc.default.password=lportal |